(2020) 서울 하드웨어 해커톤
(2020) 서울 하드웨어 해커톤
| 구분 | 내용 |
|---|---|
| 현장해커톤 | ‘20/01/04 ~ 05 (1박2일) |
| 주제 | LPWA 기술 |
| 개발조건 | arm MBED x LPWA + 서비스 클라우드(Pelion) → 웹애플리케이션 (제품화) |
| 제공보드 | mbed board |
과제개요
| 구분 | 내용 |
|---|---|
| 팀명 | WNB(WX+b) |
| 과제 | 커넥티드스탬프(Connected Stamp) |
| 개요 | 오프라인에서 종이에 스탬프를 찍고 있는 동작을 스탬프에 저전력기술(LPWA 커넥티비티 기술)을 적용하여 종이와 도장없이 스마트폰/기기의 디지털 매체에 아날로그 감성을 적용한 기술 |
![]()
![]()
프로젝트 개발과정
- 물품구매내역
| 부품 | 모델 | 단가 | 개수 | 가격 |
|---|---|---|---|---|
| MCU | esp-12e | 6,050 | 1 | 6,050 |
| 서보모터 | servo | 3,520 | 1 | 3,520 |
| 리튬폴리머 | LiPo | 2,700 | 1 | 2,700 |
| TP4056 | TP4056 | 550 | 1 | 550 |
| 적색LED(5파이) | - | - | 1 | - |
| 4파이 PCB서포트(스틸) | - | - | 7 | - |
| 4파이 너트 | - | - | 4 | - |
| 4파이 PCB서포트(플라스틱) | - | - | 1 | - |
| 압정 | - | - | 1 | - |
| 로커스위치 | - | - | 1 | - |
| 점퍼 | - | - | 12 | - |
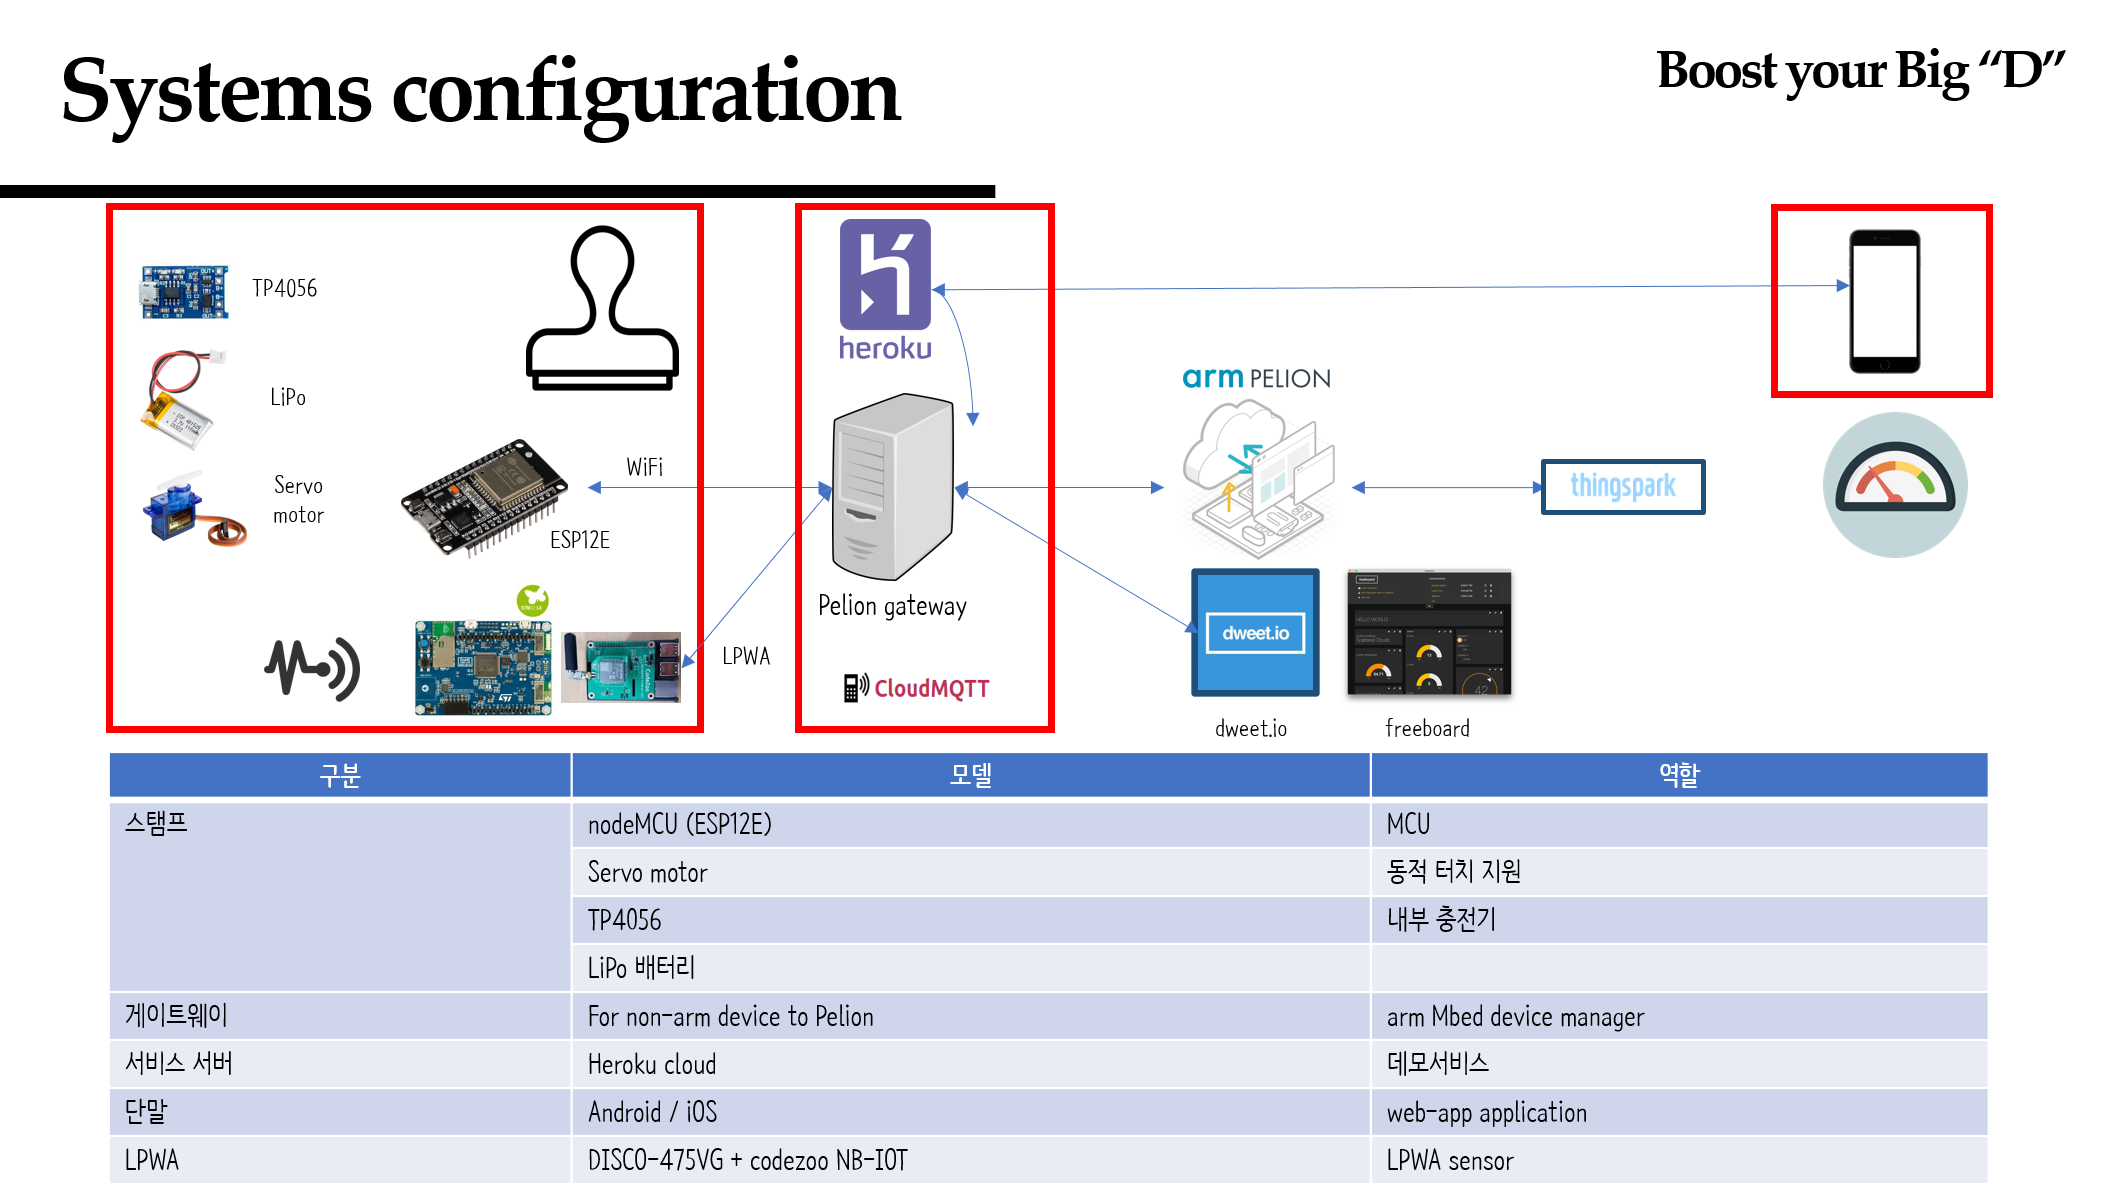
전체시스템구성
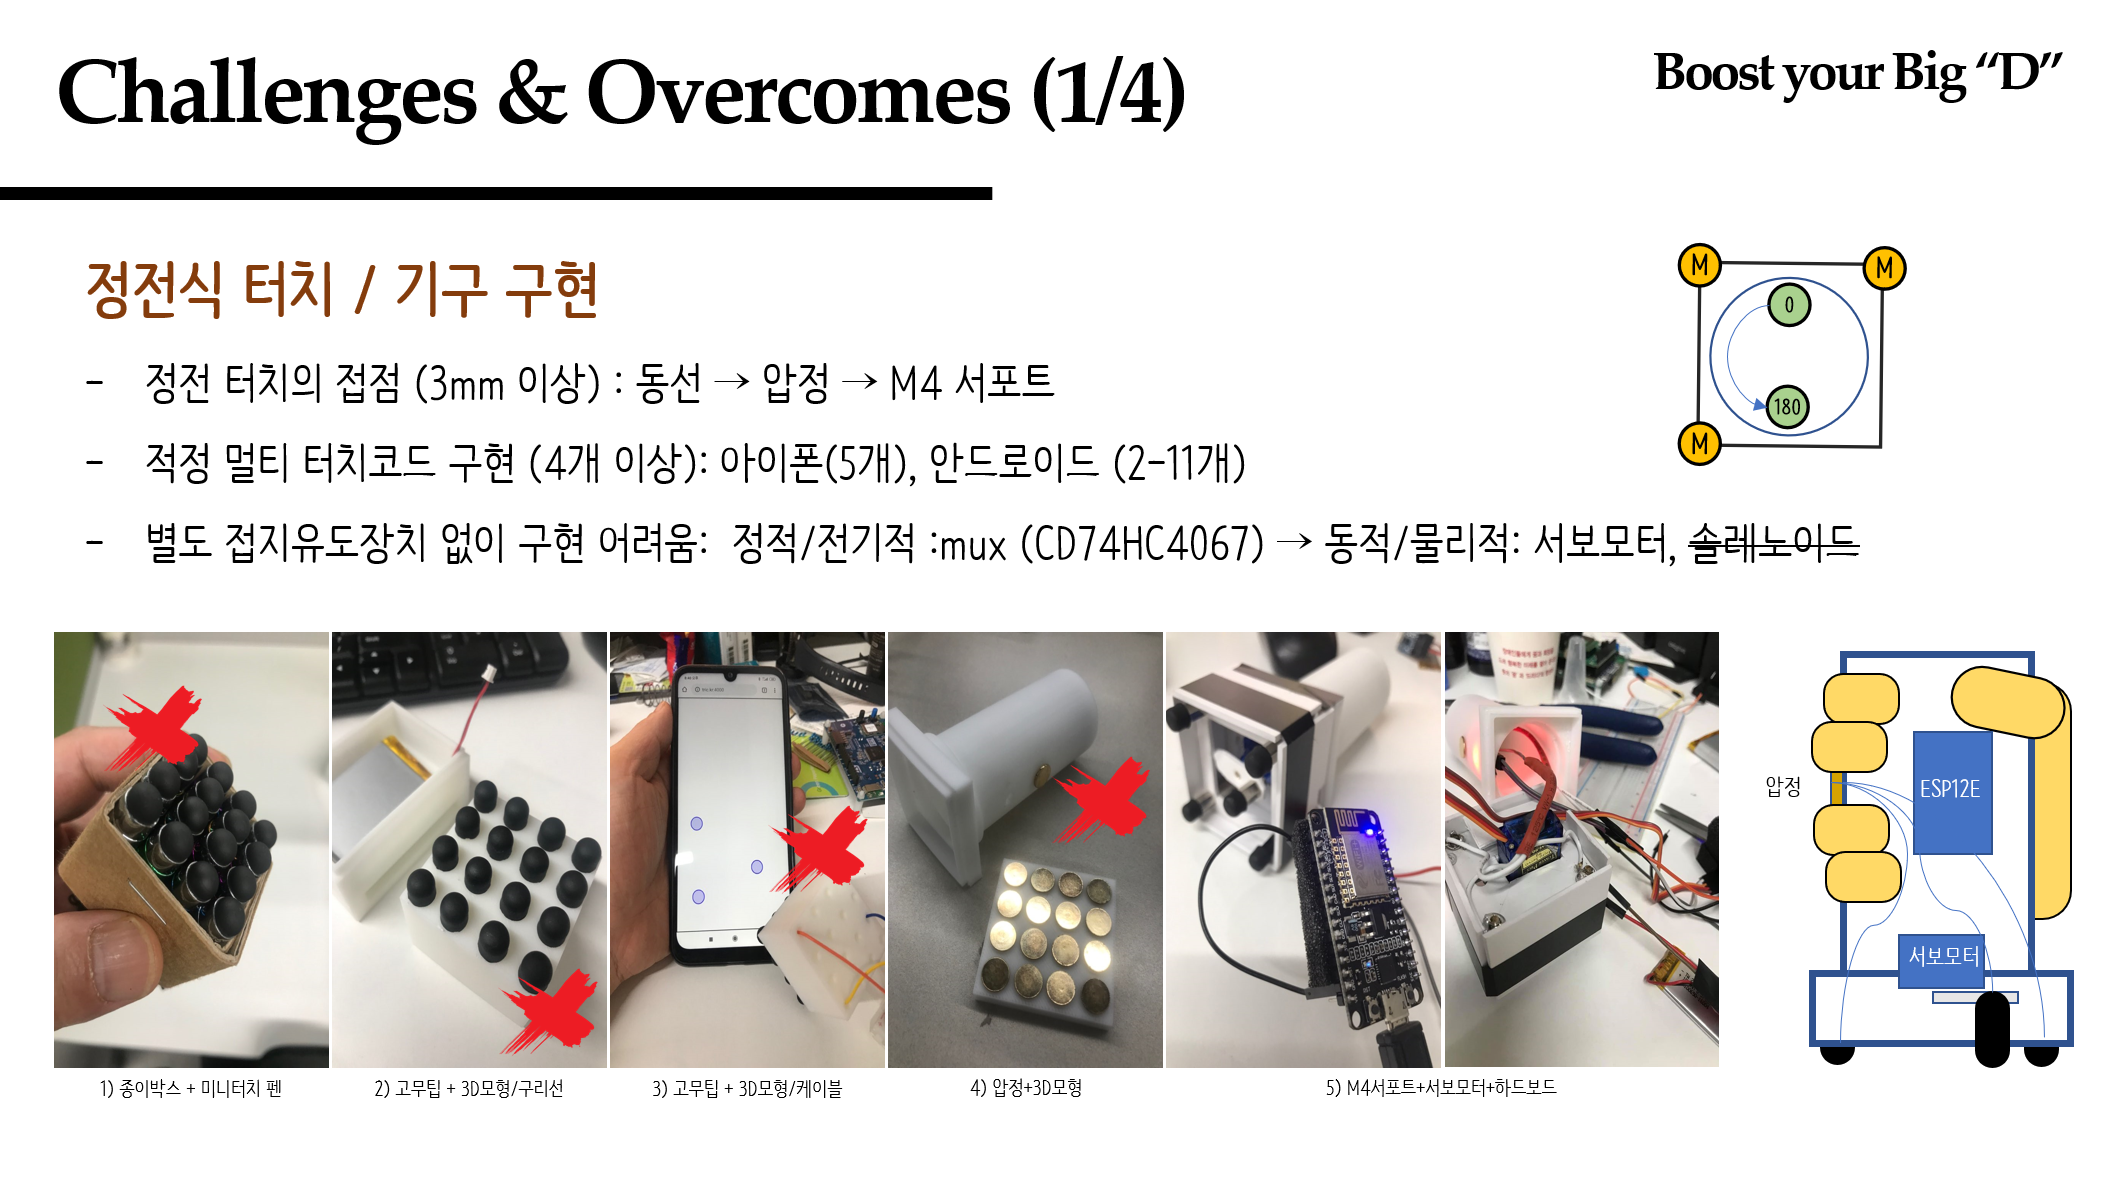
기구 구현
- 정전식터치/기구구현
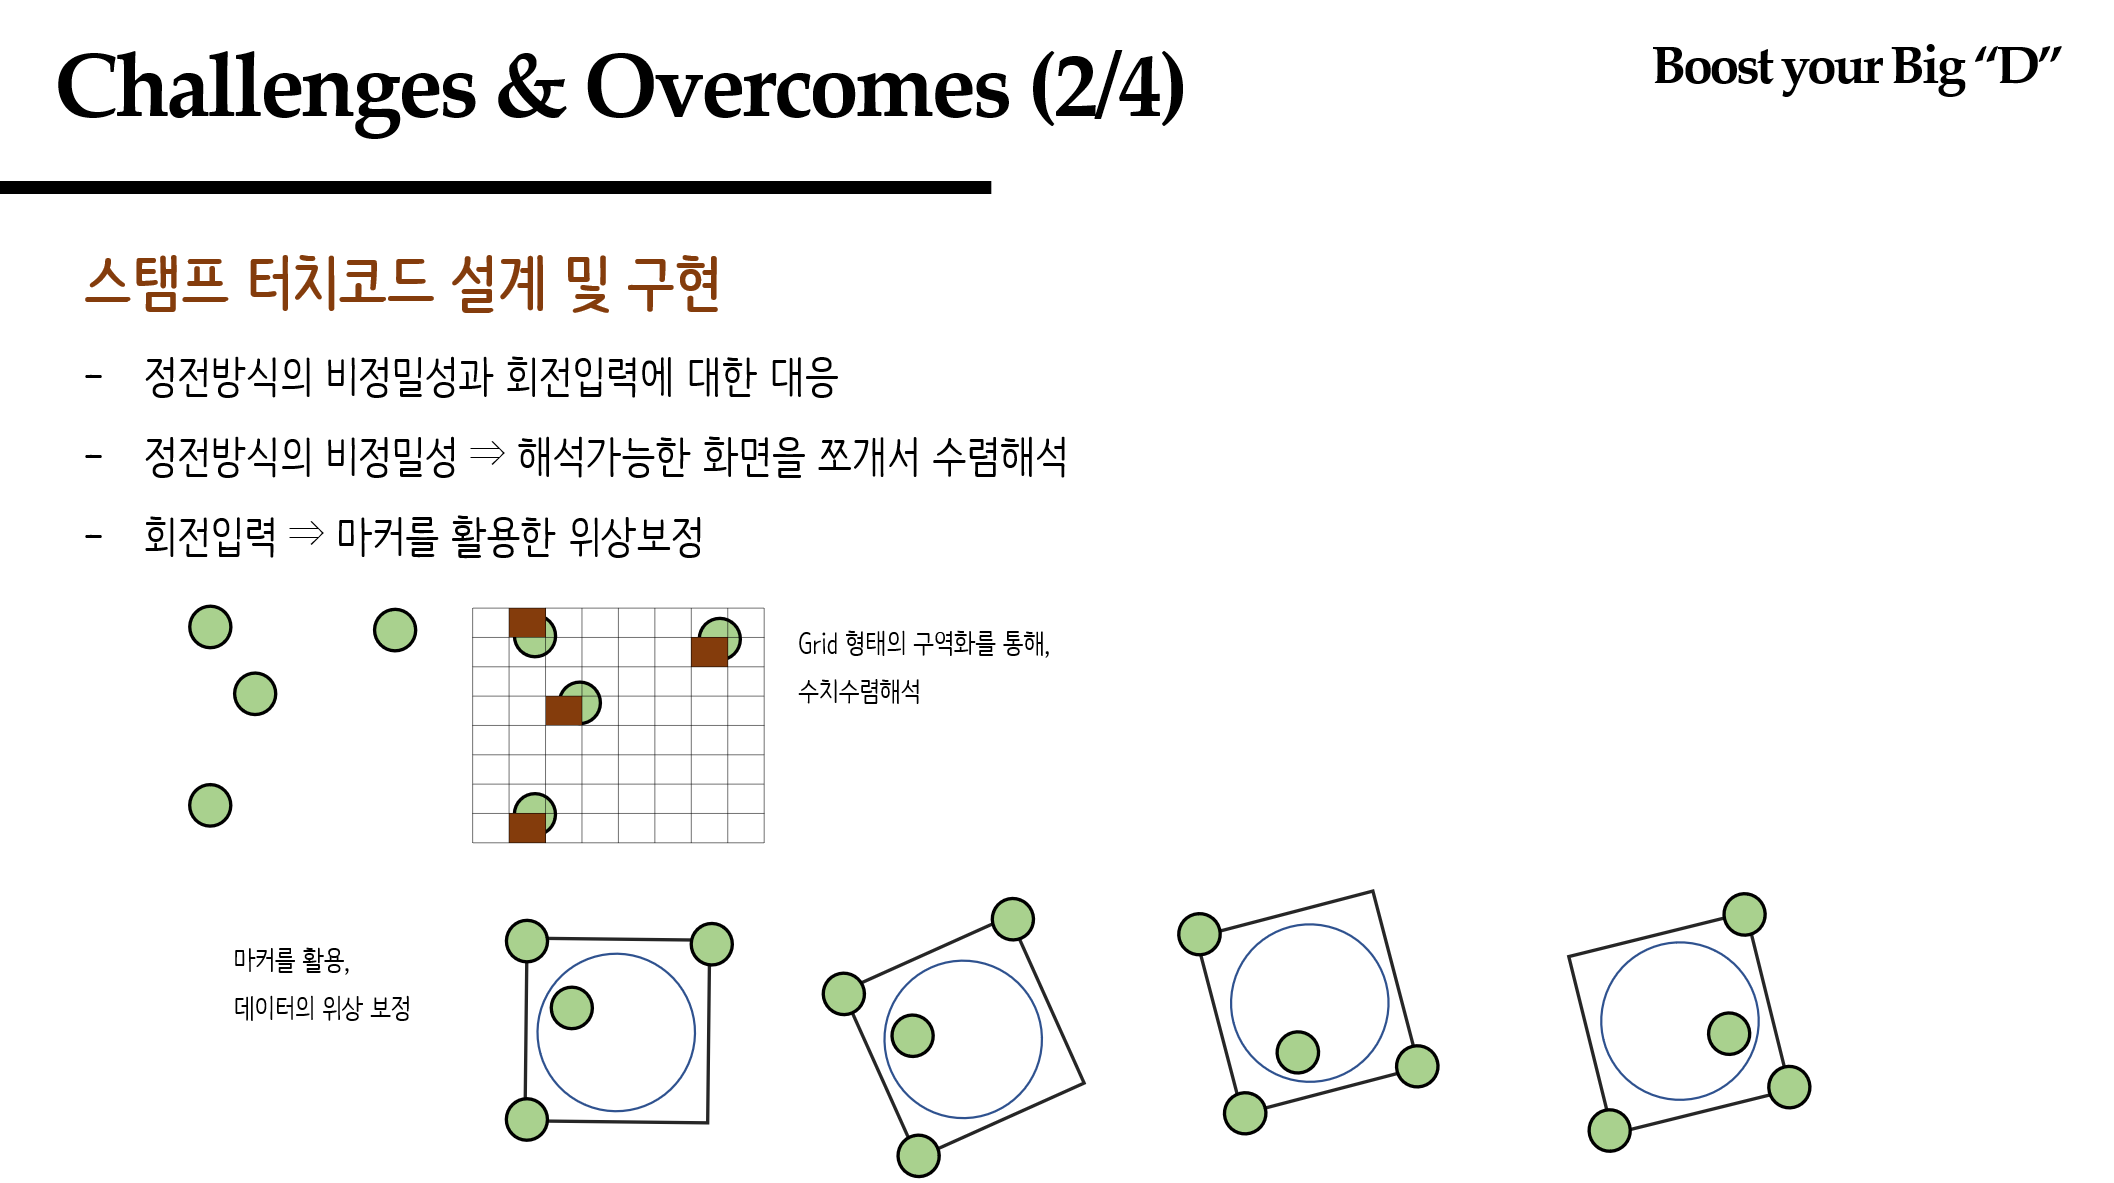
- 스탬프 터치코드 설계 및 구현
커텍티드(스마트) 스탬프 w/ esp-12e
$ wget https://github.com/pushdown99/hackathon2/blob/master/esp12.ino
| 구분 | 내용 |
|---|---|
| servo motor | 0 - 180 degress control w/ digital input |
| Value | 지정된 digital Input (GPIO2) |
#include <stdlib.h>
#include <ESP8266WiFi.h>
#include <PubSubClient.h>
#include <Servo.h>
int servoPin = 2;
int ledPin = 0;
int minValue = 530; // 544
int maxValue = 2400; // 2400

Servo servo;

const char* ssid        = "";
const char* password    = "";

const char* mqttServer   = "";
const int   mqttPort     = ;
const char* mqttUser     = "";
const char* mqttPassword = "";

WiFiClient espClient;
PubSubClient client(espClient);

long lastMsg = 0;
char msg[50];
char topic[50] = "popup-iot/12/1/11/2";
int value = 0;

void setup_wifi() {

  delay(10);
  // We start by connecting to a WiFi network
  Serial.println();
  Serial.print("Connecting to ");
  Serial.println(ssid);

  WiFi.begin(ssid, password);

  while (WiFi.status() != WL_CONNECTED) {
    digitalWrite(ledPin, HIGH);
    delay(50);
    Serial.print(".");
    digitalWrite(ledPin, LOW);
    delay(50);
  }
  randomSeed(micros());

  Serial.println("");
  Serial.println("WiFi connected");
  Serial.println("IP address: ");
  Serial.println(WiFi.localIP());
}

void callback(char* topic, byte* payload, unsigned int length) {
  Serial.print("Message arrived [");
  Serial.print(topic);
  Serial.print("] ");
  for (int i = 0; i < length; i++) {
    Serial.print((char)payload[i]);
  }
  Serial.println();
  char buf[32];
  memset(buf, 0, 32);
  memcpy(buf, payload, length);
  int rad = atoi((char*)buf);
  servo.write(rad);
  Serial.print("rad: ");
  Serial.println(rad);
}

void reconnect() {
  // Loop until we're reconnected
  while (!client.connected()) {
    Serial.print("Attempting MQTT connection...");
    // Create a random client ID
    String clientId = "ESP12-MYSTAMP-";
    clientId += String(random(0xffff), HEX);
    // Attempt to connect
    if (client.connect(clientId.c_str())) {
      Serial.println("connected");
      // Once connected, publish an announcement...
    } else {
      Serial.print("failed, rc=");
      Serial.print(client.state());
      Serial.println(" try again in 5 seconds");
      // Wait 5 seconds before retrying
      delay(5000);
    }
  }
  digitalWrite(ledPin, HIGH);
}

void setup() {
  pinMode (BUILTIN_LED, OUTPUT);     // Initialize the BUILTIN_LED pin as an output
  pinMode (ledPin, OUTPUT);
  pinMode (servoPin, OUTPUT);

  Serial.begin(115200);
  setup_wifi();

  client.setServer(mqttServer, mqttPort);
  client.setCallback(callback);

  while (!client.connected()) {
    Serial.println("Connecting to MQTT...");
    if (client.connect("ESP12E", mqttUser, mqttPassword )) {
      Serial.println("connected");
      client.subscribe(topic);
      digitalWrite(ledPin, HIGH);
    } else {
      Serial.print("failed with state ");
      Serial.print(client.state());
      digitalWrite(ledPin, LOW);
      delay(2000);
    }
  }

  servo.attach(servoPin, minValue, maxValue);
  servo.write(0);
  delay(1000);
  servo.write(30);
  delay(1000);
  servo.write(60);
  delay(1000);
  servo.write(90);
  delay(1000);
  servo.write(120);
  delay(1000);
  servo.write(150);
  delay(1000);
  servo.write(180);
  delay(1000);
  servo.write(0);

//  digitalWrite(ledPin, LOW);
}

void loop() {
  if(WiFi.status() != WL_CONNECTED) {
    digitalWrite(ledPin, LOW);
    setup_wifi();
  }
  if (!client.connected()) {
    digitalWrite(ledPin, LOW);
    reconnect();
  }
  client.loop();
}
ESP8266
아두이노IDE에 보드매니저(Board Manager) 등록
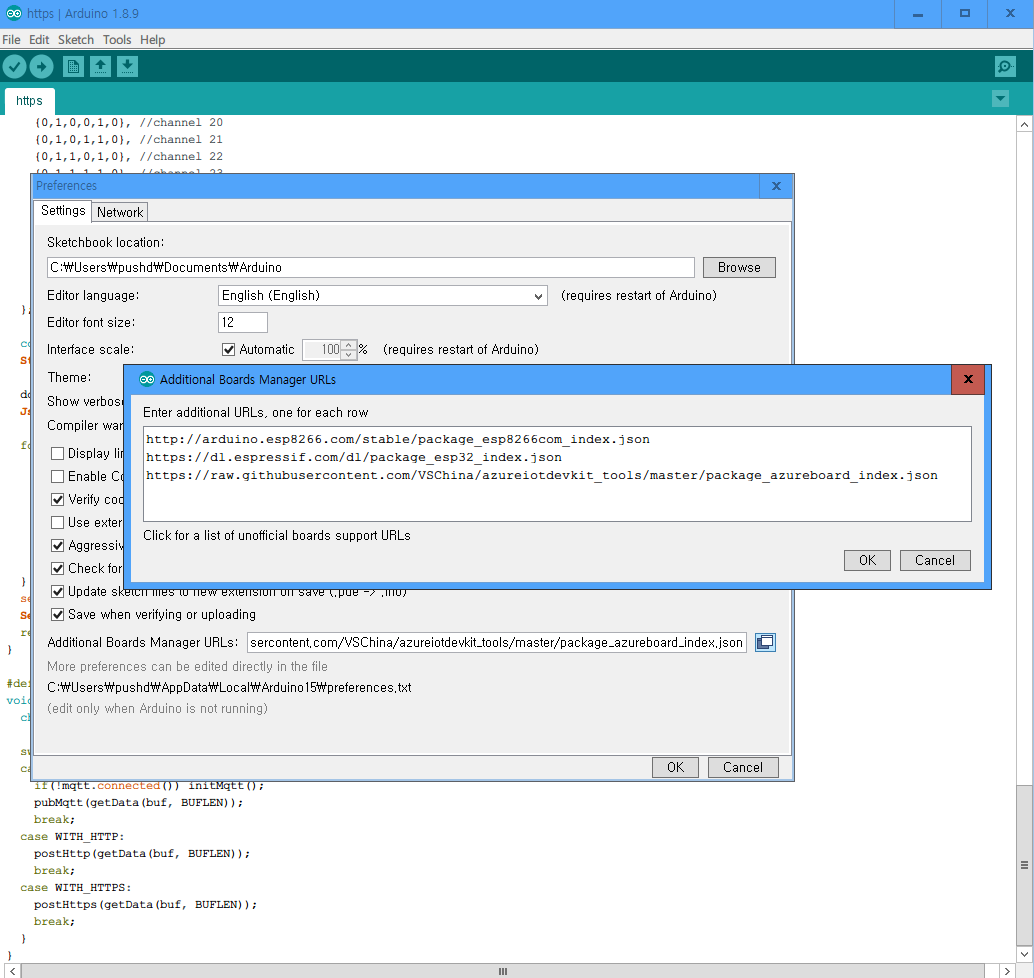
아두이노IDE > File > Preferences > Additional Board Manager URLs
http://arduino.esp8266.com/stable/package_esp8266com_index.json
https://dl.espressif.com/dl/package_esp32_index.json
ESP8266 라이브러리 추가
라이브러리 검색 추가
아두이노IDE > Sketch > include Library > Manage libraries

#include <ESP8266WiFi.h>
#include <PubSubClient.h>
#include <Servo.h>
Mbed Basic
arm Mbed 개발
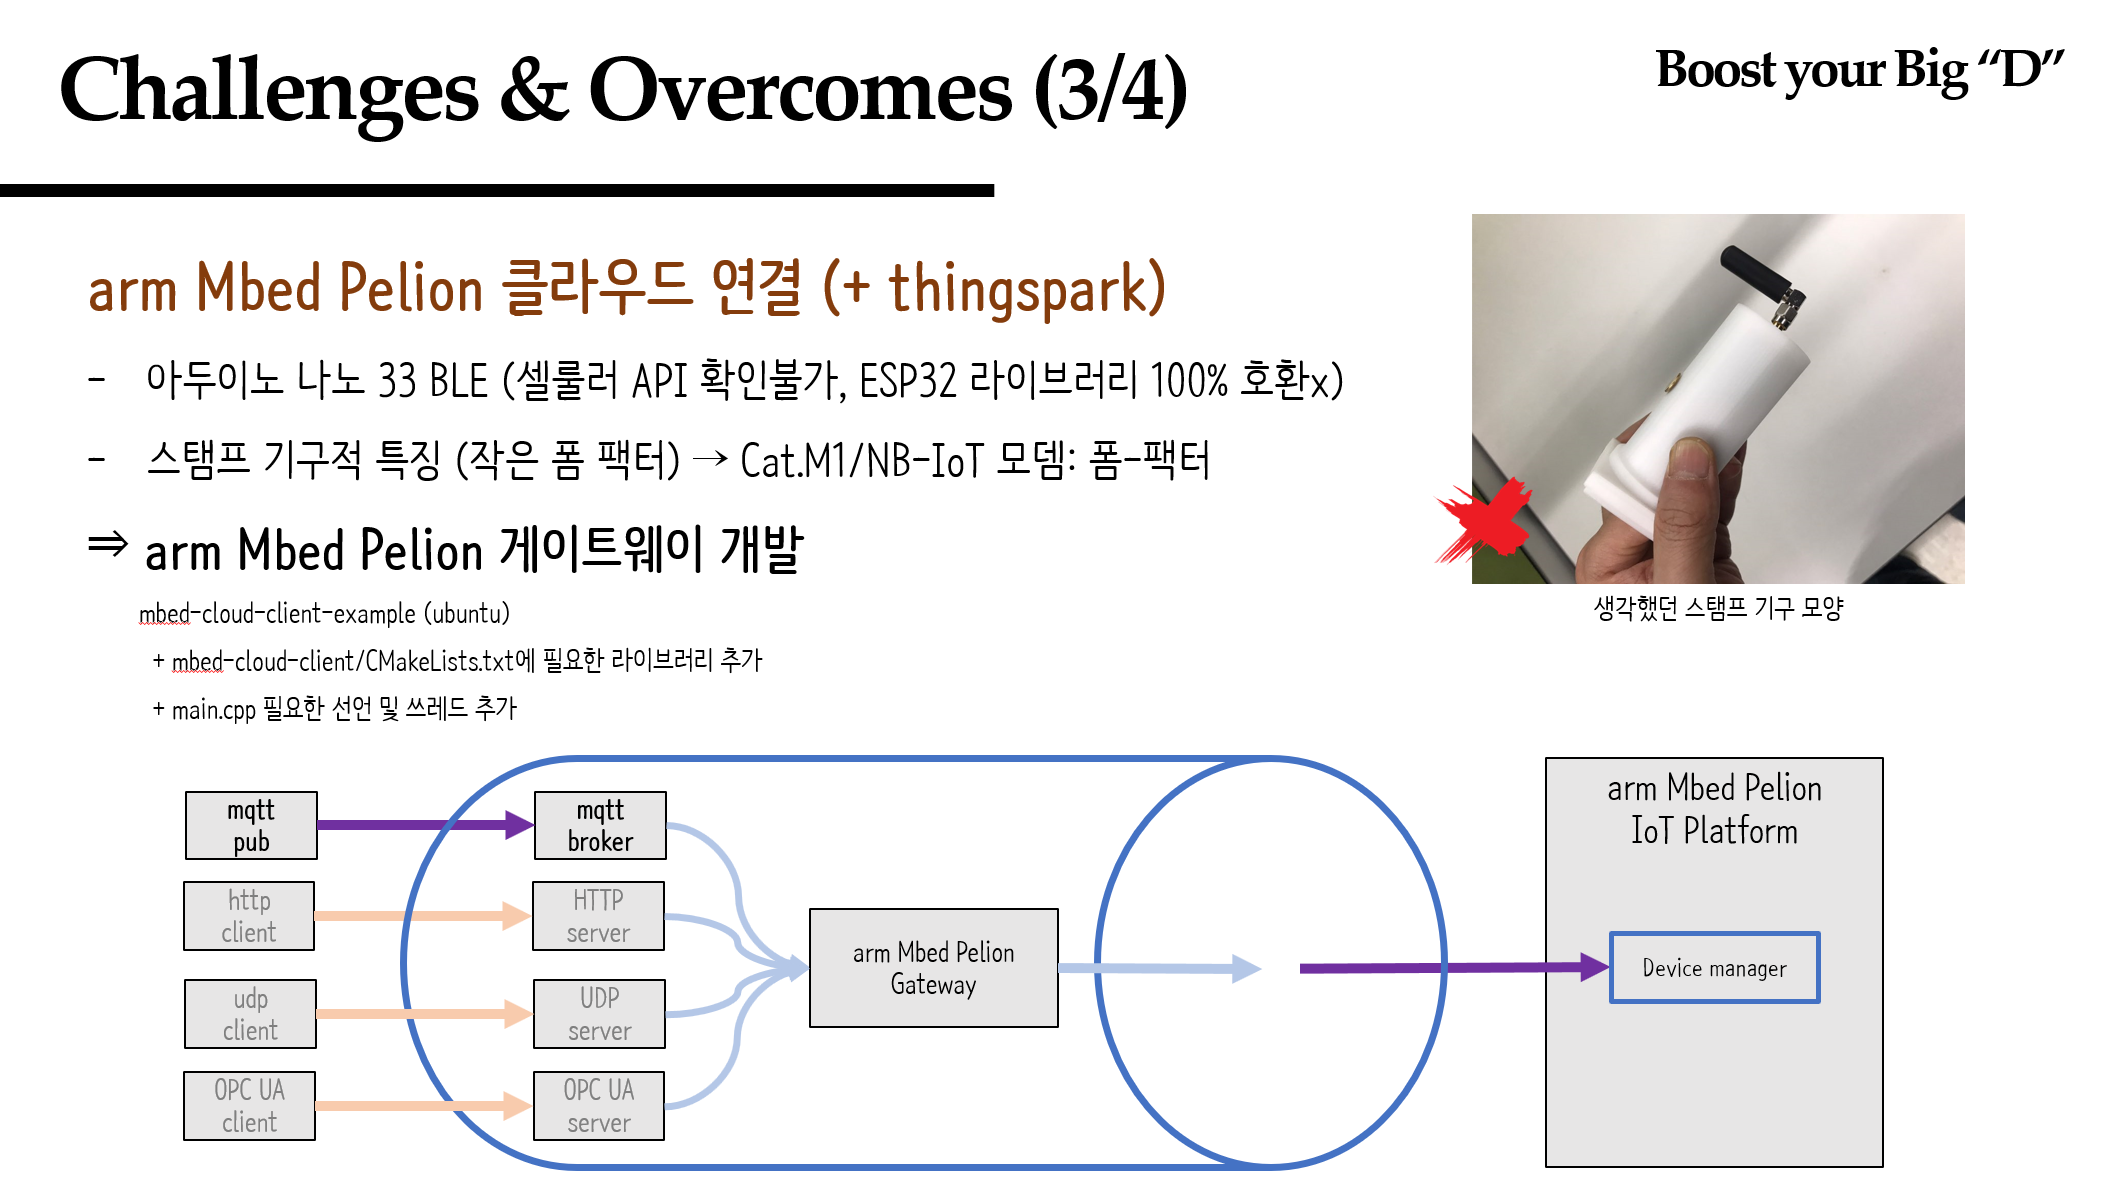
Mbed 게이트웨이(Gateway) 개발하기
- mbed-cloud-client-example: Mbed Pelion Client /Ubuntu
- How to Install
$ mbed import https://github.com/ARMmbed/mbed-cloud-client-example
$ cd mbed-cloud-client-example
$ python pal-platform/pal-platform.py fullbuild --target x86_x64_NativeLinux_mbedtls --toolchain GCC --external ./../define.txt --name mbedCloudClientExample.elf
$ ./mbedCloudClientExample.elf
구분 소스 CMakeLists.txt https://github.com/pushdown99/hackathon2/blob/master/gateway/CMakeLists.txt main.cpp https://github.com/pushdown99/hackathon2/blob/master/gateway/main.cpp - mbed-cloud-client/CMakeLists.txt에 필요한 라이브러리 추가
target_link_libraries(mbedCloudClient factory-configurator-client mbedTrace nanostacklibservice nanostackeventloop mbedclient certificate-enrollment-client update-client pal paho-mqtt3a pthread http curl)- main.cpp 필요한 선언 및 쓰레드 추가
Mbed Cellular for NB-IoT (CodeZoo NB-IOT 모뎀) 개발하기
  $ mbed import http://os.mbed.com/users/Daniel_Lee/code/mbed-os-example-cellular-TPB23/
  $ cd mbed-os-example-cellular-TPB23
- mbed-mqtt 라이브러리 추가
$ mbed add https://github.com/ARMmbed/mbed-mqtt.git
| 구분 | 소스 |
|---|---|
| mbed_app.json | https://github.com/pushdown99/hackathon2/blob/master/cellular/mbed_app.json |
| main.cpp | https://github.com/pushdown99/hackathon2/blob/master/cellular/main.cpp |
- mbed_lib.json 변경 (mqtt)
- main.cpp 변경 (mqtt 코드 추가)
$ mbed compile -t <toolchain> -m <TARGET_BOARD>
- Copy firmware
*.binfile to board storage.
Heroku
Using Heroku CLI
Heroku-CLI$ curl https://cli-assets.heroku.com/install-ubuntu.sh | sh $ heroku --version heroku/7.0.0 (darwin-x64) node-v8.0.0Installation and Deploy using Heroku Git
$ heroku login
heroku: Enter your login credentials
Email: me@example.com
Password:
Two-factor code:
Logged in as me@heroku.com

$ git clone https://git.heroku.com/mystamp.git
$ cd mystamp
$ npm install
$ npm start

...

$ git add .
$ git commit -am "make it better"
$ git push
화면/결과물
![]()
| Output | Download |
|---|---|
| 동영상 | mp4 |
| 소개 | mp4 |
| 자료 | pptx |